【初心者向け】WebUIの設定情報をプリセットとして保存する方法!!!
![](https://blogcake.net/wp-content/uploads/2023/03/webui-preset-eyecatch.jpg)
こんにちは、画像生成AIでひたすら猫のイラストを生成している じょじお(@jojio‗illust)です。
今回もStable Diffusionの記事です。
画像生成を効率化するWebUIユーザー必須プラグイン「Config-Presets」を紹介します。
![](https://blogcake.net/wp-content/uploads/2023/02/eagle-eyecatch-300x158.jpg)
▲AI画像の大量ファイルをプロンプトと一緒に簡単に整理する方法はこちら。
Stable Diffusionのプロンプトエンジニアリングの基本について理解したい方には、初心者向けのプロンプトガイドを作りましたのでそちらを見てください!
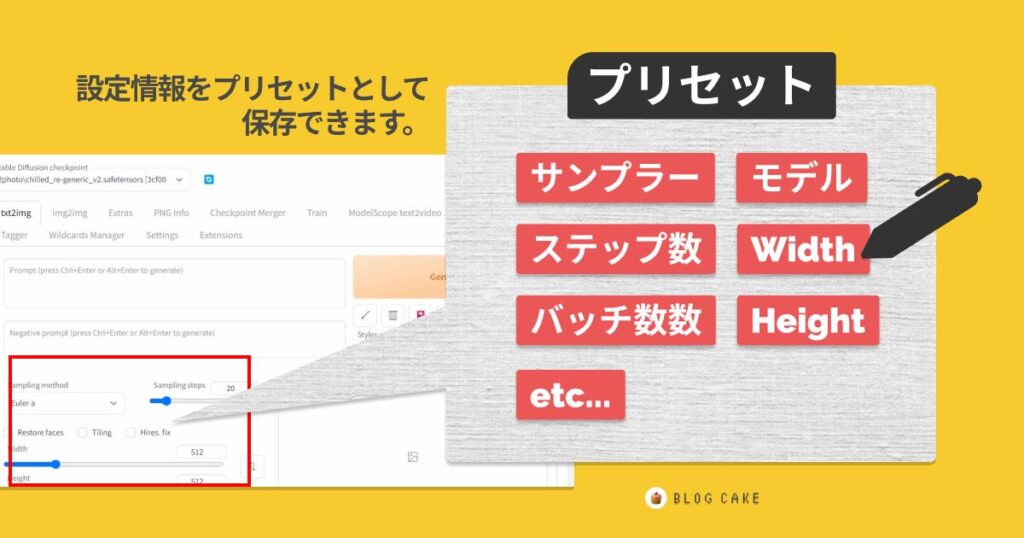
![](https://blogcake.net/wp-content/uploads/2023/03/stable-diffusion-prompt-guide2-300x158.jpg)
よく使う画像設定情報を保存する方法
![WebUIの設定情報をまとめて保存できるプラグイン「Config-Presets」](https://blogcake.net/wp-content/uploads/2023/03/webui-preset-1024x538.jpg)
![](https://blogcake.net/wp-content/uploads/2022/08/笑い 男.png)
WebUIを起動するたびに、いつものサンプラーや画像サイズに設定変更するの面倒ですよね。
![](https://blogcake.net/wp-content/uploads/2023/02/jojio-profile-small-150x150.jpg)
WebUIの拡張機能「Config-Presets」は、設定情報をプリセットとして保存できます。
![](https://blogcake.net/wp-content/uploads/2023/02/jojio-profile-small-150x150.jpg)
これを使えば、複数のパラメータ情報をワンクリックで一括変更できるよ。
【Config-Presets】のインストール方法
![](https://blogcake.net/wp-content/uploads/2023/02/jojio-profile-small-150x150.jpg)
インストールしてみます。
Config-presetsインストール手順
- WebUIを開きExtentionsタブをクリック
- Availableタブをクリック
- Load fromボタンをクリックします。
- Config-presetsを探して「Install」ボタンをクリックします。
- WebUIをリロードします。
![WebUIの設定情報をまとめて保存できるプラグイン「Config-Presets」](https://blogcake.net/wp-content/uploads/2023/03/2023-03-29_15h32_28.jpg)
![](https://blogcake.net/wp-content/uploads/2023/03/extentions-300x158.jpg)
【Config-Presets】プリセットを保存する方法
![](https://blogcake.net/wp-content/uploads/2023/02/jojio-profile-small-150x150.jpg)
早速使ってみます。
よく使う設定情報をセットして保存してみましょう。
1.各種設定をします。
![WebUIの設定情報をまとめて保存できるプラグイン「Config-Presets」](https://blogcake.net/wp-content/uploads/2023/03/2023-03-29_18h12_50.jpg)
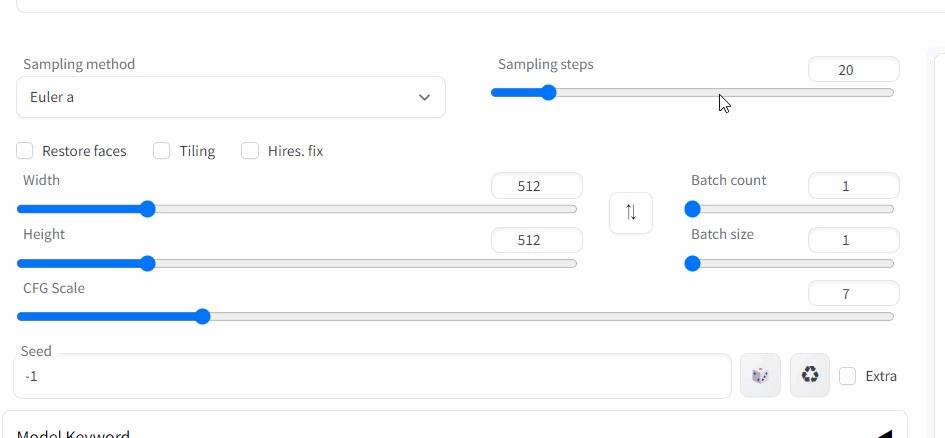
▲プリセットを保存するために、まずは保存したいパラメータの値を調整しましょう。保存できる設定は下記です。
- ステップ数
- サンプラー
- Width
- Height
- Hi res有効化
- Hi res denoising_strength
- Hi resスケール
- バッチ数
- バッチサイズ
プロンプトは保存できません。
▼プロンプトを保存したい場合はこちら。
![](https://blogcake.net/wp-content/uploads/2023/03/Stable-diffusion-style-300x158.jpg)
2.Add/Removeをクリックします。
![WebUIの設定情報をまとめて保存できるプラグイン「Config-Presets」](https://blogcake.net/wp-content/uploads/2023/03/2023-03-29_18h07_43.jpg)
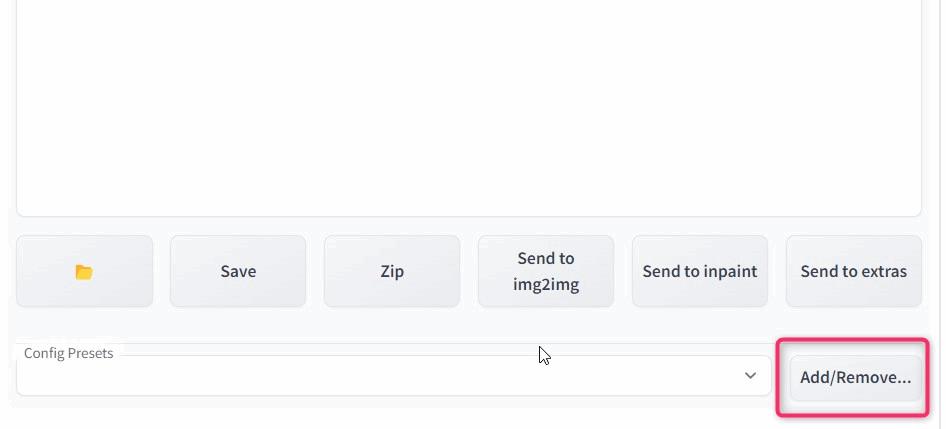
▲パラメータをセットしたら、画面右下に「Add/Remove」というボタンが追加されているはずなのでこちらをクリックします。
3.保存したい項目を選択します。
![WebUIの設定情報をまとめて保存できるプラグイン「Config-Presets」](https://blogcake.net/wp-content/uploads/2023/03/2023-03-29_18h11_17.jpg)
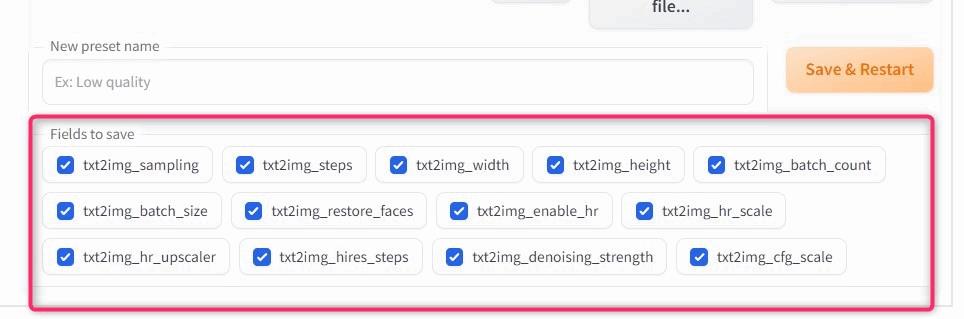
▲↑図のようなチェックボックスがたくさんならんだ画面が展開されます。保存する項目を選択してチェックしましょう。保存したくないものはチェックを外します。パラメータの意味は下の表を確認してください。
![](https://blogcake.net/wp-content/uploads/2023/02/jojio-profile-small-150x150.jpg)
例えば、サンプラーとステップ数だけ保存したい場合は、txt2img_stepsとtxt2img_samplingだけにチェックを入れます。
ラベル名 | 説明 |
---|---|
txt2img_steps | ステップ数 |
txt2img_sampling | サンプラー |
txt2img_width | 横幅 |
txt2img_height | 縦幅 |
txt2img_enable_hr | Hi res有効化 |
txt2img_hr_scale | Hi resスケール |
txt2img_denoising_strength | Hi res denoising_strength |
txt2img_batch_count | バッチ数 |
txt2img_batch_size | バッチサイズ |
4.名前を付けて保存ボタンをクリックします。
![WebUIの設定情報をまとめて保存できるプラグイン「Config-Presets」](https://blogcake.net/wp-content/uploads/2023/03/2023-03-29_18h16_51.jpg)
▲プリセットにわかりやすい名前を付けて、「Save & Restart」をクリックするとプリセットが保存されます。
![](https://blogcake.net/wp-content/uploads/2023/02/jojio-profile-small-150x150.jpg)
以上でプリセットが保存できたはずです。
【Config-Presets】プリセットを呼び出す方法
![](https://blogcake.net/wp-content/uploads/2023/02/jojio-profile-small-150x150.jpg)
保存したプリセットを呼び出してみます。
![WebUIの設定情報をまとめて保存できるプラグイン「Config-Presets」](https://blogcake.net/wp-content/uploads/2023/03/2023-03-29_18h22_43.jpg)
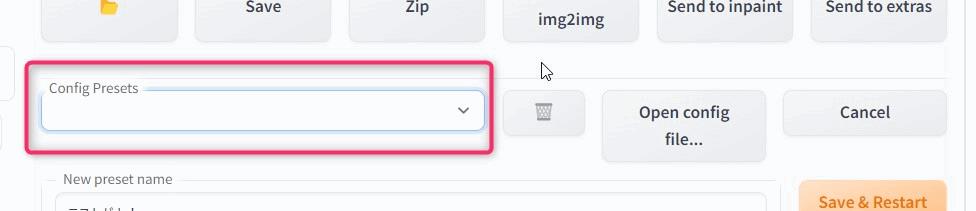
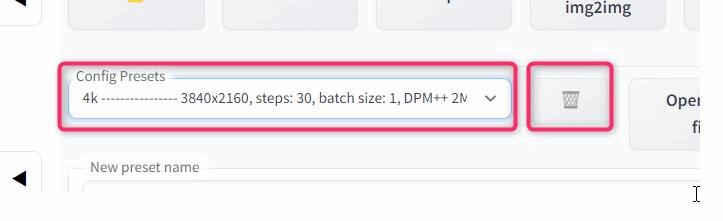
▲WebUIのTxt2Imgタブを開き、画面右下のConfig Presetsプルダウンをクリックします。
![WebUIの設定情報をまとめて保存できるプラグイン「Config-Presets」](https://blogcake.net/wp-content/uploads/2023/03/2023-03-29_18h23_08.jpg)
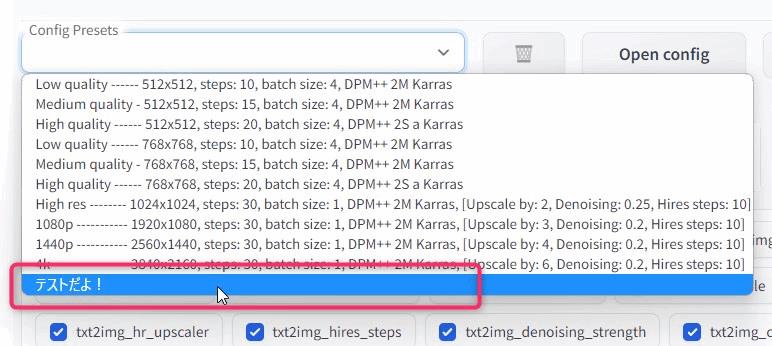
▲保存すみのプリセットが表示されるので、ロードしたいプリセット名をクリックすると設定情報のセットがロードされ、Webui上の設定が更新されます。
【Config-Presets】プリセットを削除する方法
![WebUIの設定情報をまとめて保存できるプラグイン「Config-Presets」](https://blogcake.net/wp-content/uploads/2023/03/2023-03-29_18h30_55.jpg)
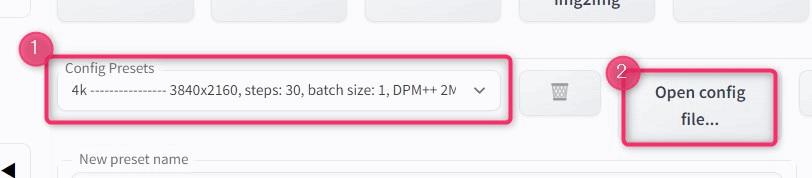
▲保存済みプリセットを削除する方法は、プリセットをプルダウンから選択して隣のごみ箱アイコンをクリックします。
【Config-Presets】プリセットを編集する方法
保存したプリセットは、下記の設定ファイルに保存されます。
これを直接編集すれば設定情報を編集することができます。
![WebUIの設定情報をまとめて保存できるプラグイン「Config-Presets」](https://blogcake.net/wp-content/uploads/2023/03/2023-03-29_18h32_38.jpg)
設定ファイルの保存場所
(あなたがWebuIをインストールした場所)\stable-diffusion-webui\extensions\Config-Presets\config-img2img.json
変更方法
![WebUIの設定情報をまとめて保存できるプラグイン「Config-Presets」](https://blogcake.net/wp-content/uploads/2023/03/2023-03-29_15h54_04.jpg)
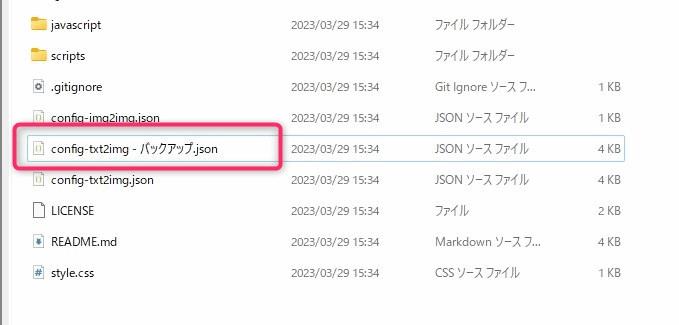
▲編集するときはバックアップを取っておくことをおすすめします。
ファイルの編集時に構文などのミスがあるとWebUIが起動しなくなります。直接編集するときは必ずバックアップを取りましょう。
![](https://blogcake.net/wp-content/uploads/2023/02/jojio-profile-small-150x150.jpg)
ファイルのフォーマットはJSONです。JSONがよくわからない人は、WebUI上から編集するのが無難です。
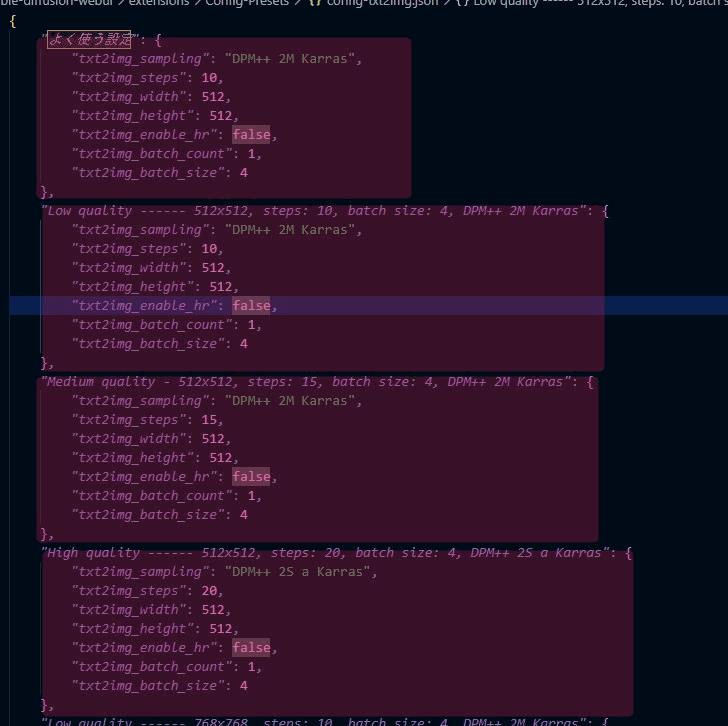
![WebUIの設定情報をまとめて保存できるプラグイン「Config-Presets」の設定ファイル](https://blogcake.net/wp-content/uploads/2023/03/2023-03-29_15h57_23.jpg)
▲各ブロックが、1つの設定です。
![WebUIの設定情報をまとめて保存できるプラグイン「Config-Presets」の設定ファイル](https://blogcake.net/wp-content/uploads/2023/03/2023-03-29_15h56_52.jpg)
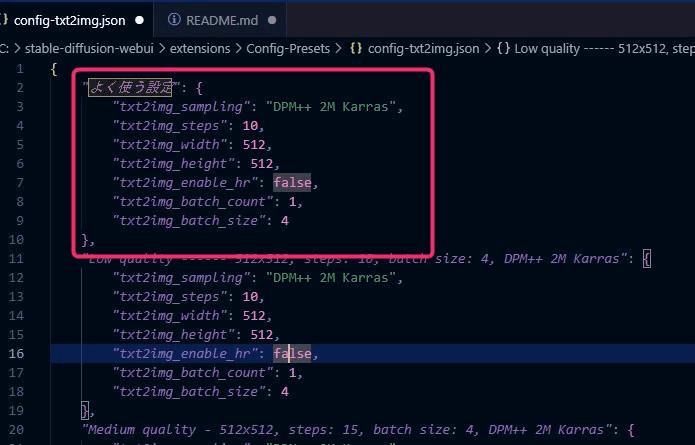
▲ブロックを追加すれば設定を追加できます。
ブロックを編集すれば既存の設定を修正できます。
![](https://blogcake.net/wp-content/uploads/2023/02/jojio-profile-small-150x150.jpg)
先ほども言ったようにJSONがよくわからない人は、情報を変更したいのでしたら、プリセットを一旦削除してから新しく作り直した方が無難です。
参考
https://github.com/Zyin055/Config-Presets
その他の便利なプラグイン
![](https://blogcake.net/wp-content/uploads/2023/03/webui-ar-300x158.jpg)
まとめ
以上、設定情報をプリセットとして保存できる便利なプラグインの紹介でした。
![](https://blogcake.net/wp-content/uploads/2023/02/jojio-profile-small-150x150.jpg)
最後まで読んでくださってありがとうございます!
この記事がお役に立てましたら、シェアボタンからシェアしていただけたら嬉しいです!
コメント