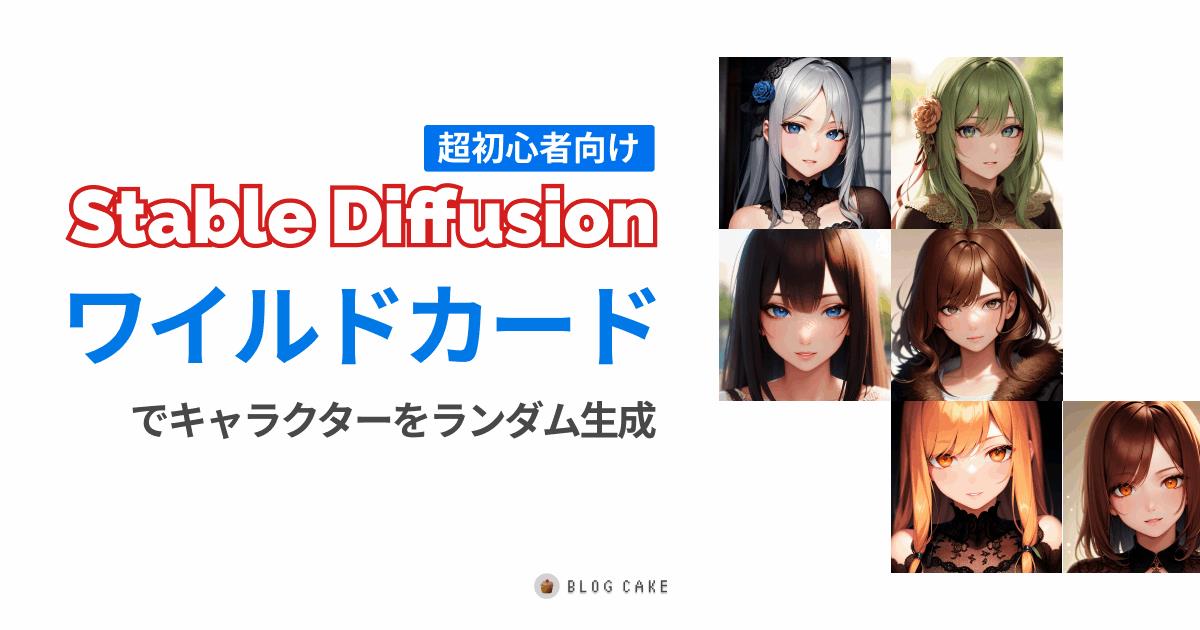
大量のキャラをランダム生成する方法(Stable Diffusion)
![](https://blogcake.net/wp-content/uploads/2023/03/Dynamic-prompts-eyecatch.jpg)
こんにちは、画像生成AIでひたすら猫のイラストを生成している じょじお(@jojio‗illust)です。
今回もStable Diffusionの記事です!
前回、同一キャラの大量のバリエーションを簡単に一括生成する方法について紹介しました。
今回も似たような拡張機能を見つけたので紹介したいと思います。
![](https://blogcake.net/wp-content/uploads/2023/02/eagle-eyecatch-300x158.jpg)
▲AI画像の大量ファイルをプロンプトと一緒に簡単に整理する方法はこちら。
Stable Diffusionのプロンプトエンジニアリングの基本について理解したい方には、初心者向けのプロンプトガイドを作りましたのでそちらを見てください!
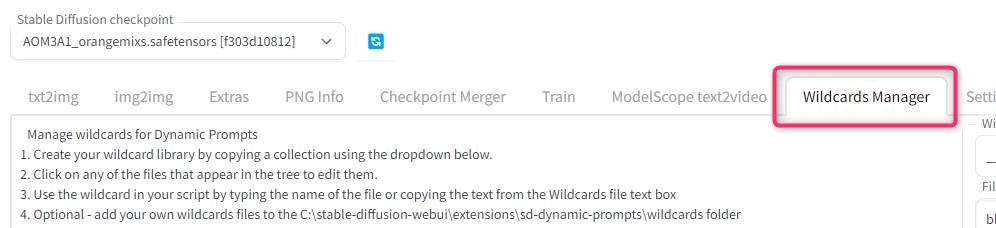
![](https://blogcake.net/wp-content/uploads/2023/03/stable-diffusion-prompt-guide2-300x158.jpg)
Dynamic promptsとは?
![Dynamic Prompts](https://blogcake.net/wp-content/uploads/2023/03/dynamic-prompt-1024x538.jpg)
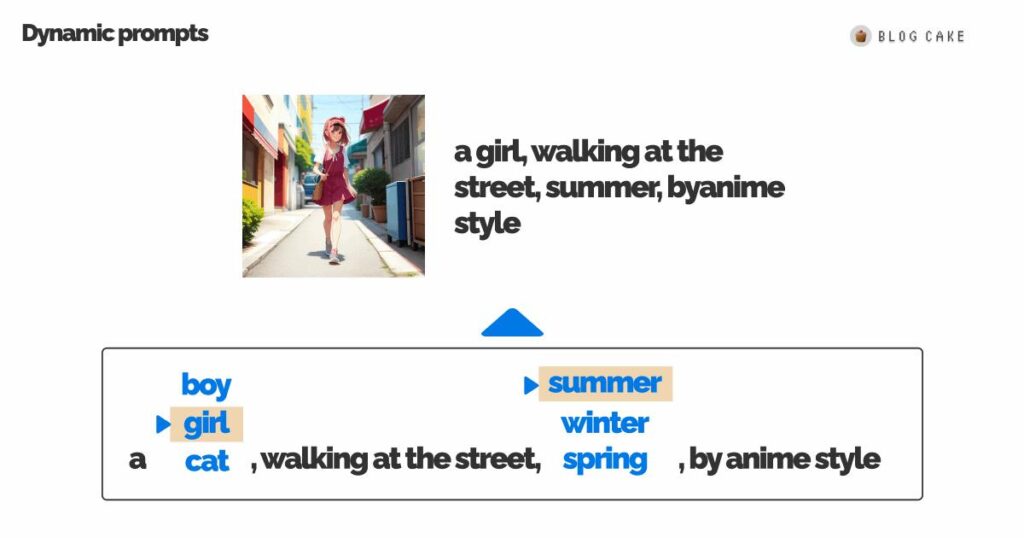
今回紹介するのは「Dynamic prompts」というStable diffusion WebUIの拡張機能です。
Dynamic promptsは、あらかじめ用意した単語リストからランダムに単語を選択して、プロンプトを作成し、画像生成を行える機能です。
Dynamic promptsのインストール方法
インストールしてみます。
![Dynamic Promptsインストール方法](https://blogcake.net/wp-content/uploads/2023/03/2023-03-23_09h53_42.jpg)
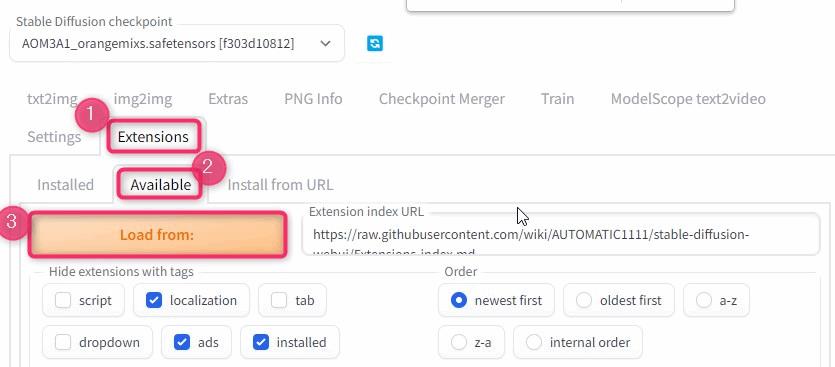
▲「Extensions」タブ > Availlableタブ > Load Formボタンをクリック。
![Dynamic promptsの使い方](https://blogcake.net/wp-content/uploads/2023/03/2023-03-23_08h36_10.jpg)
▲「Dynamic prompts」という拡張機能をインストールします。見つけられない人はCtrl+Fで検索窓を表示してdynamicというワードで検索してみてください。
![Dynamic Promptsインストール方法](https://blogcake.net/wp-content/uploads/2023/03/2023-03-23_09h57_59.jpg)
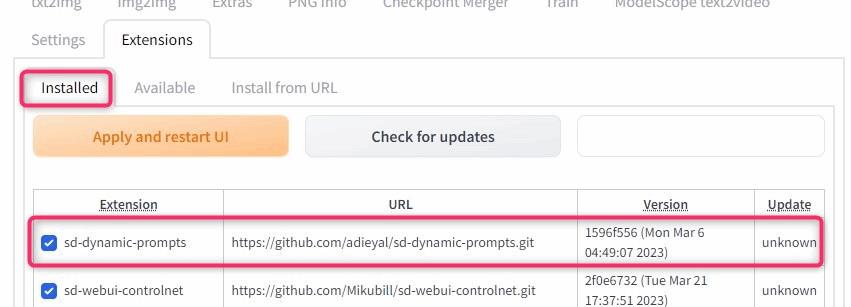
▲インストールできましたら、Installedタブに移り、インストール済みのプラグインの中に「Dynamic prompts」があることを確認してください。
Dynamic promptsの基本的な使い方
![](https://blogcake.net/wp-content/uploads/2023/03/tejilabo_96.jpg)
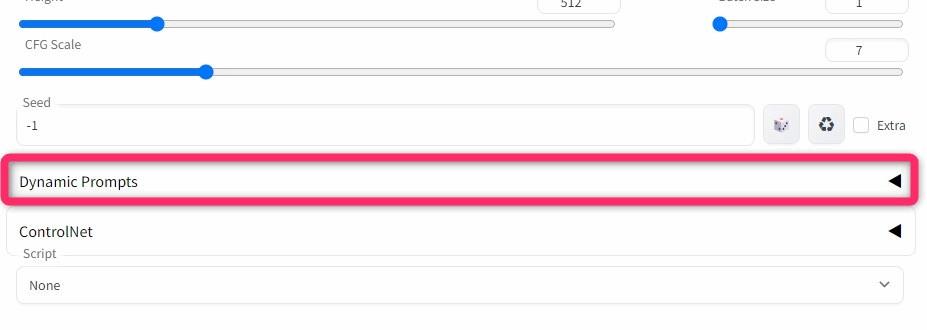
▲Dynamic Promptsというプルダウンが追加されています。クリックします。
![](https://blogcake.net/wp-content/uploads/2023/03/tejilabo_97.jpg)
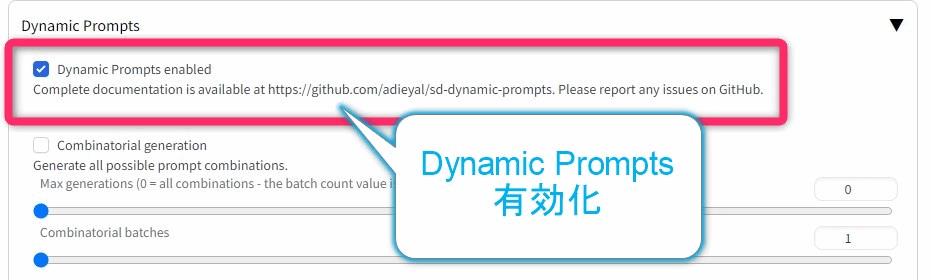
▲Dynamic Prompts Enabledというチェックをオンにします。
![](https://blogcake.net/wp-content/uploads/2023/02/jojio-profile-small-150x150.jpg)
ここでオフオンの切り替えを行います。
基本的な使い方
best quality, A {cat|dog|boy|young girl}, close-up
![](https://blogcake.net/wp-content/uploads/2023/03/2023-03-23_10h21_31.jpg)
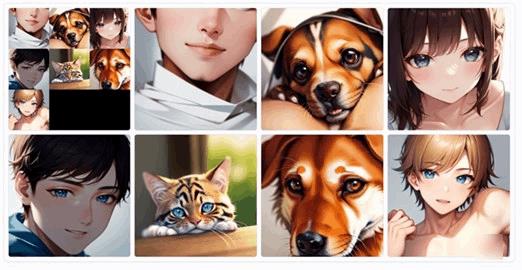
▲バッチを7にして生成したところ、boyが3、catが1、dogが2、young girlが1生成されました。
best quality, A {cat|dog|boy|young girl}, close-up
![](https://blogcake.net/wp-content/uploads/2023/03/2023-03-23_10h28_28.jpg)
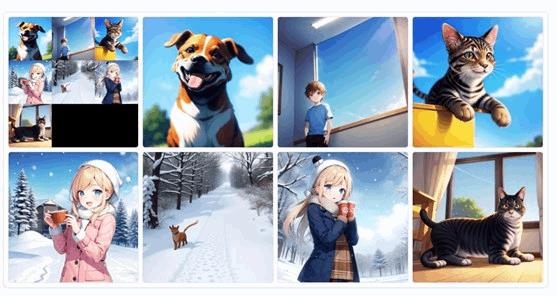
▲上の例の場合、下記のような組み合わせでプロンプトが生成されます。
- best quality, A cat, indoor, blue sky
- best quality, A girl, outdoor, snowing winter
- best quality, A dog, outdoor, snowing winter
- best quality, A girl, outdoor, snowing winter
- best quality, A cat, outdoor, blue sky
- best quality, A boy, indoor, blue sky
- best quality, A dog, outdoor, blue sky
- …
![](https://blogcake.net/wp-content/uploads/2023/02/jojio-profile-small-150x150.jpg)
以上が最も基本的な使い方です。
ワイルドカードをファイルから指定する方法
![](https://blogcake.net/wp-content/uploads/2023/02/jojio-profile-small-150x150.jpg)
単語リストファイルを使うこともできます。
単語リストは自作するか、拡張機能に用意された既存の単語リストを使うことができます。
1.用意されたファイルを使う方法
![](https://blogcake.net/wp-content/uploads/2023/02/jojio-profile-small-150x150.jpg)
拡張機能にはデフォルトで単語リストが用意されています。
単語リストはいくつかのコレクションという単位でカタマリになっていて、コレクション単位でインポートできます。
![](https://blogcake.net/wp-content/uploads/2023/02/jojio-profile-small-150x150.jpg)
ためしに「Artist」コレクションをインポートしてみます。
![](https://blogcake.net/wp-content/uploads/2023/03/2023-03-23_11h50_19.jpg)
▲WebUI上のWildcards Managerタブをクリックします。
![](https://blogcake.net/wp-content/uploads/2023/03/2023-03-23_10h39_17.jpg)
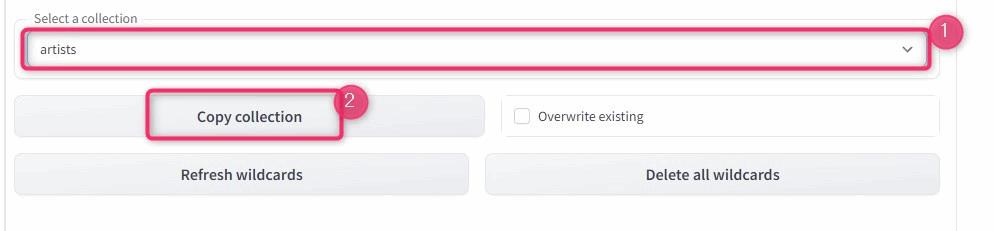
▲コレクションのプルダウンリストから「artist」を選択し、Copy collectionをクリック。
![](https://blogcake.net/wp-content/uploads/2023/03/2023-03-23_10h43_20.jpg)
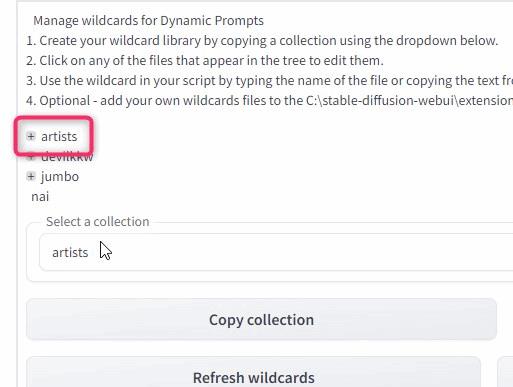
▲図のところに「artists」というコレクションがインポートできます。クリックできるようになっているのでクリックします。
![](https://blogcake.net/wp-content/uploads/2023/03/2023-03-23_10h45_03.jpg)
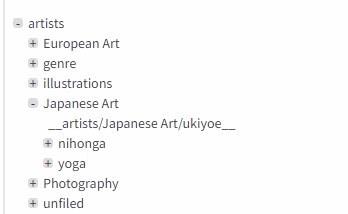
▲コレクションはサブフォルダによる階層構造になっています。何回かクリックしてファイルを見てみましょう。「__ファイル名__」のように、名前の前後に「__(アンダースコア2つ)」がついているものがファイルです。ついていなければフォルダです。
![](https://blogcake.net/wp-content/uploads/2023/03/2023-03-23_10h47_15.jpg)
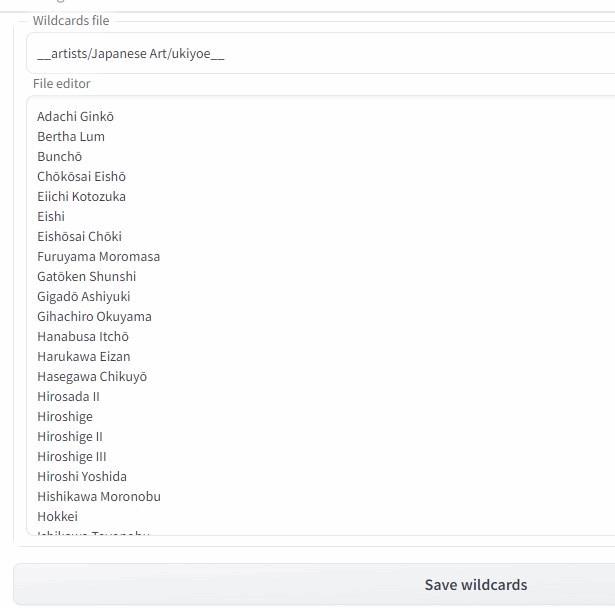
▲ファイルをクリックすると、画面右側のペインにファイルの中身を表示できます。私がクリックした「artists/Japanese Art/ukiyoe」というファイルには、浮世絵のアーティスト名がリストされているようです。
ためしにここにリストされているアーティストに、ネコの絵を描いてもらいましょう。下記のプロンプトを書きました。
best quality, A cat, by __artists/Japanese Art/ukiyoe__
![](https://blogcake.net/wp-content/uploads/2023/02/jojio-profile-small-150x150.jpg)
ファイル名を使うには「__(アンダースコア2つ)」を付けたファイル名を挿入したい箇所に書くだけです。
![ランダム生成結果](https://blogcake.net/wp-content/uploads/2023/03/2023-03-23_11h09_55.jpg)
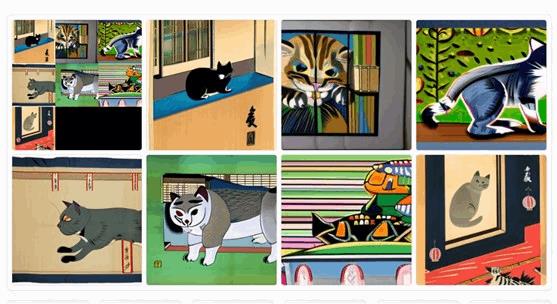
▲なんとなく浮世絵っぽいものが出来上がったので成功したっぽいです。
![](https://blogcake.net/wp-content/uploads/2023/03/2023-03-23_11h11_05.jpg)
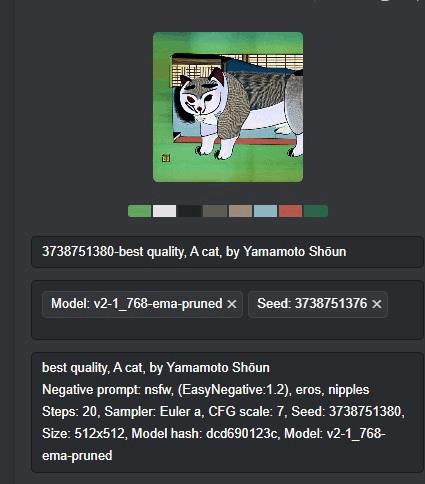
▲実際にそれぞれの絵がどんなプロンプト(アーティスト名)で生成されたかを確認するには、PNGInfoでメタタグを確認すればわかります。上の絵は「Yamamoto shoun」さんという名前がプロンプトに入りました。
![](https://blogcake.net/wp-content/uploads/2023/02/jojio-profile-small-150x150.jpg)
PINGInfoや画像一覧をかんたんに見るにはEagleというツールが絶対おすすめです。
\ 30日間 無料で使える! /
![](https://blogcake.net/wp-content/uploads/2023/02/eagle-eyecatch-300x158.jpg)
2.ファイルを自作する方法
![](https://blogcake.net/wp-content/uploads/2023/02/jojio-profile-small-150x150.jpg)
ファイルは自作することもできるよ。
下記のフォルダの中にテキストファイルを作成します。
C:\stable-diffusion-webui\extensions\sd-dynamic-prompts\wildcards
![](https://blogcake.net/wp-content/uploads/2023/03/2023-03-23_11h25_27.jpg)
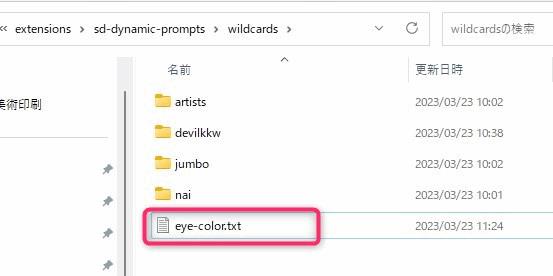
▲テキストファイルを作成します。名前は自由に決めます。「eye-color.txt」という名前にしました。
![](https://blogcake.net/wp-content/uploads/2023/03/2023-03-23_11h25_37.jpg)
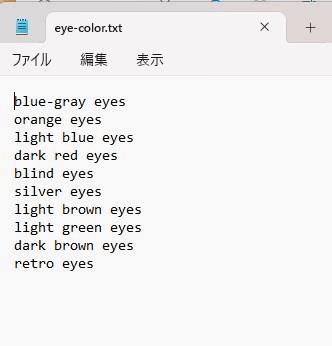
▲瞳の色のバリエーションをひとつずつ改行しながら書きます。保存して閉じます。
best quality, detailed eyes, detailed face, hires, A girl, __eye-color__
▲プロンプトはこんな感じで「__(アンダースコア2つ)」でファイル名を囲んで指定します。(拡張子は含めない)
![](https://blogcake.net/wp-content/uploads/2023/03/2023-03-23_11h34_05.jpg)
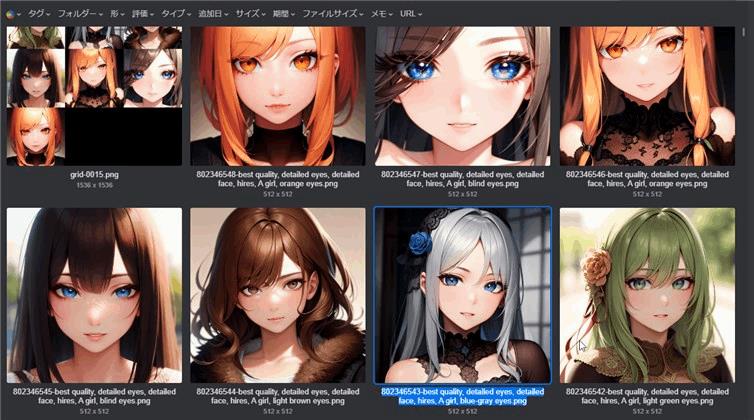
▲ランダムな瞳の色でキャラクター生成できました。
ファイルの編集方法
自作ファイルも、既存ファイルもWebUI上の「Wild cards Manager」から編集できます。
自作ファイルが認識されないときはリフレッシュしてください。
Dynamic promptsのその他の機能
ワイルドカードを複数使う。
best quality, detailed eyes, detailed face, hires,
__sex__,
__eye-color__,
__hair-style__,
__emotion__,
__clothes__,
at __where__ in __seasons__
▲こんな感じ複数使うことができます。改行や空白は無視されるので、図のようにインデントして見やすく書いてもいいです。
ワイルドカードをネスト
テキストファイルは、ネスト(再帰的処理)することができます。
つまりテキストファイルの中で別のテキストファイルを呼ぶことができます。
Dynamic promptsのドキュメント
詳細は下記のドキュメントをごらんください。
https://github.com/adieyal/sd-dynamic-prompts
ワイルドカードを使ってみた感想
![](https://blogcake.net/wp-content/uploads/2023/02/jojio-profile-small-150x150.jpg)
大量にキャラクターが必要な時や、スタイルの組み合わせの研究などに使えそうです。
また、デフォルトで用意されている単語が豊富なので、拡張機能を使わなくてもチートシートとしてインストールするのもありだと思います。
![](https://blogcake.net/wp-content/uploads/2023/02/jojio-profile-small-150x150.jpg)
nsfw系のワードも豊富なので、エッ〇な人にもおすすめです!!!!
\ 30日間 無料で使える! /
コメント
コメント一覧 (2件)
stable deffusionってまじめに言ってんの?
教えてくれてありがとう。